Monday, 29 June 2015

Wildcards


Java Generic's wildcards is a mechanism in Java Generics aimed at making it possible to cast a collection of a certain class, e.g A, to a collection of a subclass or superclass of A. This text explains how.
Here is a list of the topics covered:

    The Basic Generic Collection Assignment Problem

    Imagine you have the following class hierarchy:
    public class A { }
    public class B extends A { }
    public class C extends A { }
    
    The classes B and C both inherit from A.
    Then look at these two List variables:
    List<A> listA = new ArrayList<A>();
    List<B> listB = new ArrayList<B>();
    
    Can you set listA to point to listB ? or set listB to point to listA? In other words, are these assignments valid:
    listA = listB;
    
    listB = listA;
    
    The answer is no in both cases. Here is why:
    In listA you can insert objects that are either instances of A, or subclasses of A (B and C). If you could do this:
    List<B> listB = listA;
    
    then you could risk that listA contains non-B objects. When you then try to take objects out of listB you could risk to get non-B objects out (e.g. an A or a C). That breaks the contract of the listB variable declaration.
    Assigning listB to listA also poses a problem. This assignment, more specifically:
    listA = listB;
    
    If you could make this assignment, it would be possible to insert A and C instances into the List<B> pointed to by listB. You could do that via the listA reference, which is declared to be of List<A>. Thus you could insert non-B objects into a list declared to hold B (or B subclass) instances.

    When are Such Assignments Needed?

    The need for making assignments of the type shown earlier in this text arises when creating reusable methods that operate on collections of a specific type.
    Imagine you have a method that processes the elements of a List, e.g. print out all elements in the List. Here is how such a method could look:
    public void processElements(List<A> elements){
       for(A o : elements){
          System.out.println(o.getValue());
       }
    }
    
    This method iterates a list of A instances, and calls the getValue() method (imagine that the class A has a method called getValue()).
    As we have already seen earlier in this text, you can not call this method with a List<B> or a List<C> typed variable as parameter.

    Generic Wildcards

    The generic wildcard operator is a solution to the problem explained above. The generic wildcards target two primary needs:
    • Reading from a generic collection
    • Inserting into a generic collection
    There are three ways to define a collection (variable) using generic wildcards. These are:
    List<?>           listUknown = new ArrayList<A>();
    List<? extends A> listUknown = new ArrayList<A>();
    List<? super   A> listUknown = new ArrayList<A>();
    
    The following sections explain what these wildcards mean.

    The Unknown Wildcard

    List<?> means a list typed to an unknown type. This could be a List<A>, a List<B>, a List<String> etc.
    Since the you do not know what type the List is typed to, you can only read from the collection, and you can only treat the objects read as being Object instances. Here is an example:
    public void processElements(List<?> elements){
       for(Object o : elements){
          System.out.println(o);
       }
    }
    
    The processElements() method can now be called with any generic List as parameter. For instance aList<A>, a List<B>List<C>, a List<String> etc. Here is a valid example:
    List<A> listA = new ArrayList<A>();
    
    processElements(listA);
    

    The extends Wildcard Boundary

    List<? extends A> means a List of objects that are instances of the class A, or subclasses of A (e.g. B and C).
    When you know that the instances in the collection are of instances of A or subclasses of A, it is safe to read the instances of the collection and cast them to A instances. Here is an example:
    public void processElements(List<? extends A> elements){
       for(A a : elements){
          System.out.println(a.getValue());
       }
    }
    
    You can now call the processElements() method with either a List<A>List<B> or List<C>. Hence, all of these examples are valid:
    List<A> listA = new ArrayList<A>();
    processElements(listA);
    
    List<B> listB = new ArrayList<B>();
    processElements(listB);
    
    List<C> listC = new ArrayList<C>();
    processElements(listC);
    
    The processElements() method still cannot insert elements into the list, because you don't know if the list passed as parameter is typed to the class AB or C.

    The super Wildcard Boundary

    List<? super A> means that the list is typed to either the A class, or a superclass of A.
    When you know that the list is typed to either A, or a superclass of A, it is safe to insert instances of A or subclasses of A (e.g. B or C) into the list. Here is an example:
    public static void insertElements(List<? super A> list){
        list.add(new A());
        list.add(new B());
        list.add(new C());
    }
    
    All of the elements inserted here are either A instances, or instances of A's superclass. Since both B and C extend A, if A had a superclass, B and C would also be instances of that superclass.
    You can now call insertElements() with either a List<A>, or a List typed to a superclass of A. Thus, this example is now valid:
    List<A>      listA      = new ArrayList<A>();
    insertElements(listA);
    
    List<Object> listObject = new ArrayList<Object>();
    insertElements(listObject);
    
    
    The insertElements() method cannot read from the list though, except if it casts the read objects toObject. The elements already present in the list when insertElements() is called could be of any type that is either an A or superclass of A, but it is not possible to know exactly which class it is. However, since any class eventually subclass Object you can read objects from the list if you cast them to Object. Thus, this is valid:
    Object object = list.get(0);
    
    But this is not valid:

    A object = list.get(0);

    Enhanced for loop


    • Java's Generic's has a new for loop. 

    • This new for loop is also sometimes referred to as the "for each" loop. This new for loop makes it easier to iterate generic collections. For instance, iterating generic Set's or List's.

    Here is a simple example that iterates a generic List:
    List<String> list = new ArrayList<String>;
    
    for(String aString : list) {
        System.out.println(aString);
    }
    
    Notice how a String variable is declared inside the parantheses of the for-loop.

     For each iteration (each element in the List) this variable contains the current element (current String).

    Here is an example that uses a Set:
    Set<String> set = new HashSet<String>;
    
    for(String aString : set) {
        System.out.println(aString);
    }
    
    Notice how the for-loop looks the same as for a List.

    Here is an example for a Map
    Map<Integer, String> map = new HashMap<Integer, String>;
    
    //... add key, value pairs to the Map
    
    for(Integer aKey : map.keySet()) {
        String aValue = map.get(aKey);
        System.out.println("" + aKey + ":" + aValue);
    }
    
    for(String aValue : map.values()) {
        System.out.println(aValue);
    }
    
    Notice how an Integer and a String variable is declared inside the parantheses of each for-loop. 

    For each iteration (each element in the Map's key set or value collection) this variable contains the current element (current Integer or String).

    Generics on java classes / methods


    It is possible to generic your own Java classes. Generics is not restricted to the predefined classes in the Java API's. 

    Here is a simple example:
    public class GenericFactory<E> {
    
        Class theClass = null;
    
        public GenericFactory(Class theClass) {
            this.theClass = theClass;
        }
    
        public E createInstance()
        throws IllegalAccessException, InstantiationException {
            return (E) this.theClass.newInstance();
        }
    }
    
    The <E> is a type token that signals that this class can have a type set when instantiated. 

    Here is an example of how:
    GenericFactory<MyClass> factory =
        new GenericFactory<MyClass>(MyClass.class);
    
    MyClass myClassInstance = factory.createInstance();
    
    Notice how it is not necessary to cast the object returned from the factory.createInstance() method. 

    The compiler can deduct the type of the object from the generic type of the GenericFactory created, because you specified the type inside the <>.

    Each instance of the GenericFactory can be generified to different types. Here are two examples:
    GenericFactory<MyClass> factory =  new GenericFactory<MyClass>(MyClass.class);
    MyClass myClassInstance = factory.createInstance();
    
    GenericFactory<SomeObject> factory = new GenericFactory<SomeObject>(SomeObject.class);
    
    SomeObject someObjectInstance = factory.createInstance();
    
    
    Generics in Methods
    
    
    It is possible to generify methods in Java. Here is an example:
    public static <T> T addAndReturn(T element, Collection<T> collection){
        collection.add(element);
        return element;
    }
    
    This method specifies a type T which is used both as type for the element parameter and the generic type of the Collection. Notice how it is now possible to add elements to the collection. This was not possible if you had used a wildcard in the Collection parameter definition.
    So, how does the compiler know the type of T?
    The answer is, that the compiler infers this from your use of the method. For instance:
    String stringElement = "stringElement";
    List<String> stringList = new ArrayList<String>();
    
    String theElement = addAndReturn(stringElement, stringList);    
    
    
    Integer integerElement = new Integer(123);
    List<Integer> integerList = new ArrayList<Integer>();
    
    Integer theElement = addAndReturn(integerElement, integerList);    
    
    Notice how we can call the addAndReturn() method using both String's and Integer's and their corresponding collections. The compiler knows from the type of the T parameter and collection<T>parameter definitions, that the type is to be taken from these parameters at call time (use time).
    The compiler can even perform more advanced type inference. For instance, the following call is also legal:
    String stringElement = "stringElement";
    List<Object> objectList = new ArrayList<Object>();
    
    Object theElement = addAndReturn(stringElement, objectList);    
    
    In this case we are using two different types for T: String and Object. The compiler then uses the most specific type argument that makes the method call type correct. In this case it infers T to be Object.
    The inverse is not legal though:
    Object objectElement = new Object();
    List<String> stringList = new ArrayList<String>();
    
    Object theElement = addAndReturn(objectElement, stringList);
    
    In this case the compiler infers, that for the method call to be type safe, T must be a String. TheobjectElement passed in for the T element parameter must then also be a String (and it isn't). Therefore the compiler will report an error
    Class Objects as Type Literals
    Class objects can be used as type specifications too, at runtime. For instance, you can create a generified method like this:
    public static <T> T getInstance(Class<T> theClass)
        throws IllegalAccessException, InstantiationException {
    
        return theClass.newInstance();
    }
    
    Here are a few examples of calls to the getInstance() method:
    String string   = getInstance(String.class);
    
    MyClass myClass = getInstance(MyClass.class);
    
    As you can see the return type changes depending on what class object you pass in as parameter to the method. This can be quite handy in database API's like Butterfly Persistence where you read objects from a database. Here is an example method definition:
    public static <T> T read(Class<T> theClass, String sql)
        throws IllegalAccessException, InstantiationException {
    
        //execute SQL.
    
        T o = theClass.newInstance();
        //set properties via reflection.
    
        return o;
    }
    
    Here is how you would call the read() method:
    Driver employee   = read(Driver.class, "select * from drivers where id=1");
    
    Vehicle vehicle   = read(Vehicle.class, "select * from vehicles where id=1");


    Generics in collections


    Array List

    Java's List interface (java.util.List) can be generified. In other words, instances of List can be given a type, so only instances of that type can be inserted and read from that List. Here is an example:
    List<String> list = new ArrayList<String>;
    
    This list is now targeted at only String instances, meaning only String instances can be put into this list. If you try to put something else into this List, the compiler will complain.
    The generic type checks only exists at compile time. At runtime it is possible to tweak your code so that a String List has other objects that String's inserted. This is a bad idea, though.

    Accessing a Generic List

    You can get and insert the elements of a generic List like this:
    List<String> list = new ArrayList<String>;
    
    String string1 = "a string";
    list.add(string1);
    
    String string2 = list.get(0);
    
    Notice how it is not necessary to cast the object obtained from the List.get() method call, as is normally necessary. The compiler knows that this List can only contain String instances, so casts are not necessary.

    Iterating a Generic List

    You can iterate a generic List using an iterator, like this:
    List<String> list = new ArrayList<String>;
    
    Iterator<String> iterator = list.iterator();
    
    while(iterator.hasNext()){
      String aString = iterator.next();
    }
    
    Notice how it is not necessary to cast the object returned from the iterator.next() next call. Because theList is generified (has a type), the compiler knows that it contains String instances. Therefore it is not necessary to cast the objects obtained from it, even if it comes from its Iterator.
    You can also use the new for-loop, like this:
    List<String> list = new ArrayList<String>;
    
    for(String aString : list) {
        System.out.println(aString);
    }
    
    Notice how a String variable is declared inside the parantheses of the for-loop. For each iteration (each element in the List) this variable contains the current element (current String).

    Set

    Java's Set interface (java.util.Set) can be generified. In other words, instances of Set can be given a type, so only instances of that type can be inserted and read from that Set. Here is an example:
    Set<String> set = new HashSet<String>;
    
    This set is now targeted at only String instances, meaning only String instances can be put into this set. If you try to put something else into this Set, the compiler will complain.
    The generic type checks only exists at compile time. At runtime it is possible to tweak your code so that a String Set has other objects that String's inserted. This is a bad idea, though.

    Adding Elements to a Generic Set

    Adding elements to a generic Set is done using the add() method, just like you have always done:
    Set<String> set = new HashSet<String>;
    
    String string1 = "a string";
    set.add(string1);
    
    
    So what is the big difference? Well, if you try to add an element that is not a String instance, to the Set in the example above, the compiler will complain. That's a pretty nice extra type check to have.

    Iterating a Generic Set
    You can iterate a generic Set using an iterator, like this:
    Set<String> set = new HashSet<String>;
        
    Iterator<String> iterator = set.iterator();
    
    while(iterator.hasNext()){
      String aString = iterator.next();
    }
    
    Notice how it is not necessary to cast the object returned from the iterator.next() next call. Because theSet is generified (has a type), the compiler knows that it contains String instances. Therefore it is not necessary to cast the objects obtained from it, even if it comes from its Iterator.
    You can also use the new for-loop, like this:
    Set<String> set = new HashSet<String>;
    
    for(String aString : set) {
        System.out.println(aString);
    }
    
    Notice how a String variable is declared inside the parantheses of the for-loop. For each iteration (each element in the Set) this variable contains the current element (current String).

    Map

    Java's Map interface (java.util.Map) can be generified. In other words, you can set the specific type of both the keys and values in a generic Map instance. Here is an example:
    Map<Integer, String> set = new HashMap<Integer, String>;
    
    This Map can now only accept Integer instances as keys, and String instances as values.
    The generic type checks only exists at compile time. At run time it is possible to tweak your code so that other instances can be inserted. This is a bad idea, though.

    Accessing a Generic Map
    Adding and getting elements to a generic Map is done using the put() and get() methods, just like you have always done:
    Map<Integer, String> map = new HashMap<Integer, String>;
    
    Integer key1   = new Integer(123);
    String  value1 = "value 1";
    
    map.put(key1, value1);
    
    String value1_1 = map.get(key1);
    
    So what is the big difference? Well, if you try to add a key, value pair that is not a Integer, String pair instance, to the Map in the example above, the compiler will complain. That's a pretty nice extra type check to have.

    Also notice how it is not necessary to cast the String instance returned by the get() method. The compiler knows that this Map has String values, so casting is not necessary.

    You can also use the new auto boxing features of Java 5 to make it easier to specify the Integer values, like this:
    Map<Integer, String> map = new HashMap<Integer, String>;
    
    Integer key1   = 123;
    String  value1 = "value 1";
    
    map.put(key1, value1);
    
    //or
    
    map.put(123, value1);
    
    
    String value1_1 = map.get(123);
    Iterating a Generic Map
    Map has two collections you can iterate. The key Set and the value Set. Most often you iterate the key Setand access the values for each key via the Map.get() method.
    Here are two examples:
    Map<Integer, String> map = new HashMap<Integer, String>;
    
    //... add key, value pairs to the Map
    
    // iterate keys.
    Iterator<Integer> keyIterator   = map.keySet().iterator();
    
    while(keyIterator.hasNext()){
      Integer aKey   = iterator.next();
      String  aValue = map.get(aKey);
    }
    
    
    Iterator<String>  valueIterator = map.values().iterator();
    
    while(valueIterator.hasNext()){
      String aString = valueIterator.next();
    }
    
    Notice how it is not necessary to cast the object returned from the iterator.next() next call. Because theMap is generified (has a type), the compiler knows that it contains Integer instances for keys, and Stringinstances for values. Therefore it is not necessary to cast the objects obtained from the Map, even if it comes from one of its Iterator's.
    You can also use the new for-loop, like this:
    Map<Integer, String> map = new HashMap<Integer, String>;
    
    //... add key, value pairs to the Map
    
    for(Integer aKey : map.keySet()) {
        String aValue = map.get(aKey);
        System.out.println("" + aKey + ":" + aValue);
    }
    
    for(String aValue : map.values()) {
        System.out.println(aValue);
    }
    
    Notice how an Integer and a String variable is declared inside the parantheses of each for-loop. For each iteration (each element in the Map's key set or value collection) this variable contains the current element (current Integer or String).


    Monday, 22 June 2015

    JDBC connections


    JDBC connection


    import java.sql.*;  

    class MysqlConnection{  

    public static void main(String args[]) {  
    try{  
    Class.forName("com.mysql.jdbc.Driver");  
      
    Connection con=DriverManager.getConnection(  
    "jdbc:mysql://localhost:3306/sonoo","root","root");  
      
    //here sonoo is database name, root is username and password  
      
    Statement stmt=con.createStatement();  
      
    ResultSet rs=stmt.executeQuery("select * from emp");  
      
    while(rs.next())  
    System.out.println(rs.getInt(1)+"  "+rs.getString(2)+"  "+rs.getString(3));  
      
    con.close();  
      
    }catch(Exception e){ System.out.println(e);}  
      
    }  

    }  

    Types of Jdbc Drivers


    Types of Jdbc Drivers

    JDBC driver implementations vary because of the wide variety of operating systems and hardware platforms in which Java operates. Sun has divided the implementation types into four categories, Types 1, 2, 3, and 4, which is explained below −

    JDBC-ODBC driver


    In a Type 1 driver, a JDBC bridge is used to access ODBC drivers installed on each client machine. Using ODBC, requires configuring on your system a Data Source Name (DSN) that represents the target database.
    When Java first came out, this was a useful driver because most databases only supported ODBC access but now this type of driver is recommended only for experimental use or when no other alternative is available.
    DBMS Driver type 1
    The JDBC-ODBC Bridge that comes with JDK 1.2 is a good example of this kind of driver.

     JDBC-Native API

    In a Type 2 driver, JDBC API calls are converted into native C/C++ API calls, which are unique to the database. These drivers are typically provided by the database vendors and used in the same manner as the JDBC-ODBC Bridge. The vendor-specific driver must be installed on each client machine.
    If we change the Database, we have to change the native API, as it is specific to a database and they are mostly obsolete now, but you may realize some speed increase with a Type 2 driver, because it eliminates ODBC's overhead.
    DBMS Driver type 2
    The Oracle Call Interface (OCI) driver is an example of a Type 2 driver.

    JDBC-Net pure Java

    In a Type 3 driver, a three-tier approach is used to access databases. The JDBC clients use standard network sockets to communicate with a middleware application server. The socket information is then translated by the middleware application server into the call format required by the DBMS, and forwarded to the database server.
    This kind of driver is extremely flexible, since it requires no code installed on the client and a single driver can actually provide access to multiple databases.
    DBMS Driver type 3
    You can think of the application server as a JDBC "proxy," meaning that it makes calls for the client application. As a result, you need some knowledge of the application server's configuration in order to effectively use this driver type.
    Your application server might use a Type 1, 2, or 4 driver to communicate with the database, understanding the nuances will prove helpful.

    100% Pure Java

    In a Type 4 driver, a pure Java-based driver communicates directly with the vendor's database through socket connection. This is the highest performance driver available for the database and is usually provided by the vendor itself.
    This kind of driver is extremely flexible, you don't need to install special software on the client or server. Further, these drivers can be downloaded dynamically.
    DBMS Driver type 4
    MySQL's Connector/J driver is a Type 4 driver. Because of the proprietary nature of their network protocols, database vendors usually supply type 4 drivers.

    Which Driver should be Used?

    If you are accessing one type of database, such as Oracle, Sybase, or IBM, the preferred driver type is 4.
    If your Java application is accessing multiple types of databases at the same time, type 3 is the preferred driver.
    Type 2 drivers are useful in situations, where a type 3 or type 4 driver is not available yet for your database.
    The type 1 driver is not considered a deployment-level driver, and is typically used for development and testing purposes only.

    JDBC connectivity model


    JDBC connectivity model,


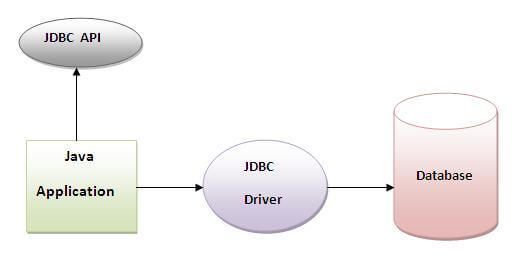
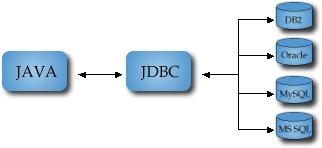
    JDBC stands for Java Database Connectivity, which is a standard Java API for database-independent connectivity between the Java programming language and a wide range of databases.
    The JDBC library includes APIs for each of the tasks mentioned below that are commonly associated with database usage.
    • Making a connection to a database.
    • Creating SQL or MySQL statements.
    • Executing SQL or MySQL queries in the database.
    • Viewing & Modifying the resulting records.
    The JDBC API provides the following interfaces and classes
    • DriverManager: This class manages a list of database drivers. Matches connection requests from the java application with the proper database driver using communication sub protocol. The first driver that recognizes a certain subprotocol under JDBC will be used to establish a database Connection.
    • Driver: This interface handles the communications with the database server. You will interact directly with Driver objects very rarely. Instead, you use DriverManager objects, which manages objects of this type. It also abstracts the details associated with working with Driver objects.
    • Connection: This interface with all methods for contacting a database. The connection object represents communication context, i.e., all communication with database is through connection object only.
    • Statement: You use objects created from this interface to submit the SQL statements to the database. Some derived interfaces accept parameters in addition to executing stored procedures.
    • ResultSet: These objects hold data retrieved from a database after you execute an SQL query using Statement objects. It acts as an iterator to allow you to move through its data.
    • SQLException: This class handles any errors that occur in a database application.
    JDBC packages

    The java.sql and javax.sql are the primary packages for JDBC 4.0. This is the latest JDBC version at the time of writing this tutorial. It offers the main classes for interacting with your data sources.
    The new features in these packages include changes in the following areas −
    • Automatic database driver loading.
    • Exception handling improvements.
    • Enhanced BLOB/CLOB functionality.
    • Connection and statement interface enhancements.
    • National character set support.
    • SQL ROWID access.
    • SQL 2003 XML data type support.
    • Annotations

    Swings in Java


    Java Swings


    • Difference between applets and swings
    • Pluggable Look and Feel
    • Swing API
    • Event handling
    Difference between applets and swings,

    Swings
    Applets
    Swing is light weight Component.
    Java swing components are platform-independent.
     Applet is heavy weight Components
    AWT components are platform-dependent.
    Swing Using UIManager. Swing have look and feel according to user view u can change look and feel. 
    Applet Does not provide this facility 
    Swing uses for stand lone Applications ,Swing have main method to execute the program.
     Applet need HTML code for Run the Applet 
     Swing uses MVC Model view Controller. 
    Applet not 
     Swing have its own Layout ..like most popular Box Layout 
    Applet uses AWT Layouts..like flow layout
    Swing have some Thread rules
    Applet doesn't have any rule.
    To execute Swing no need any browser By which we can create stand alone application But Here we have to add container and maintain all action control with in frame container.
    To execute Applet programe we should need any one browser like Appletviewer,web browser. Because Applet using browser container to run and all action control with in browser container.

    Java Swing tutorial is a part of Java Foundation Classes (JFC) that is used to create window-based applications. It is built on the top of AWT (Abstract Windowing Toolkit) API and entirely written in java.

    Unlike AWT, Java Swing provides platform-independent and lightweight components.

    The javax.swing package provides classes for java swing API such as JButton, JTextField, JTextArea, JRadioButton, JCheckbox, JMenu, JColorChooser etc.

    JFC
    The Java Foundation Classes (JFC) are a set of GUI components which simplify the development of desktop applications.

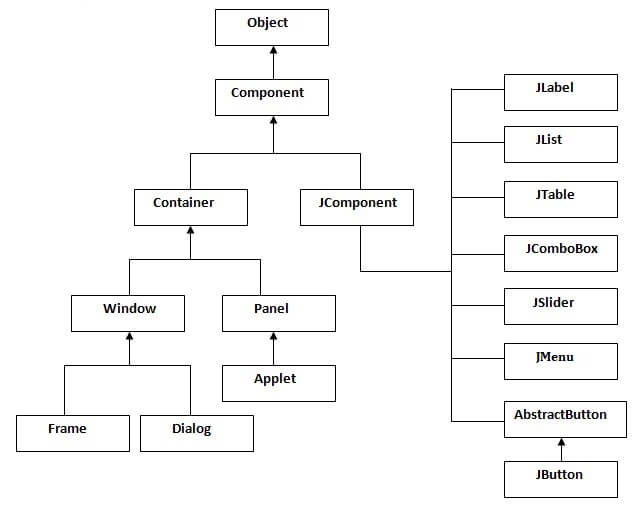
    The hierarchy of java swing API is given below.
    hierarchy of javax swing

    The methods of Component class are widely used in java swing that are given below,

    Method
    Description
    public void add(Component c)
    add a component on another component.
    public void setSize(int width,int height)
    sets size of the component.
    public void setLayout(LayoutManager m)
    sets the layout manager for the component.
    public void setVisible(boolean b)
    sets the visibility of the component. It is by default false.

    There are two ways to create a frame,
    • By creating the object of Frame class (association)
    • By extending Frame class (inheritance)
    We can write the code of swing inside the main(), constructor or any other method.

    Example,
    import javax.swing.*; 

     public class SwingExample {  
     public static void main(String[] args) {  
    JFrame f=new JFrame();//creating instance of JFrame  
     
    JButton b=new JButton("click");//creating instance of JButton  
    b.setBounds(130,100,100, 40);//x axis, y axis, width, height  
     
    f.add(b);//adding button in JFrame  
     
    f.setSize(400,500);//400 width and 500 height  
    f.setLayout(null);//using no layout managers  
    f.setVisible(true);//making the frame visible  
     }  

    We can also write all the codes of creating JFrame, JButton and method call inside the java constructor,
    import javax.swing.*;  
    public class Simple {  
    JFrame f; 

    Simple(){  
    f=new JFrame();//creating instance of JFrame  
     
    JButton b=new JButton("click");//creating instance of JButton  
    b.setBounds(130,100,100, 40);  
     
    f.add(b);//adding button in JFrame  
     
    f.setSize(400,500);//400 width and 500 height  
    f.setLayout(null);//using no layout managers  
    f.setVisible(true);//making the frame visible  
    }  
     
    public static void main(String[] args) {  
    new Simple();  
    }  


    We can also inherit the JFrame class, so there is no need to create the instance of JFrame class explicitly.

    import javax.swing.*;  
    public class Simple2 extends JFrame{//inheriting JFrame  
    JFrame f;  
    Simple2(){  
    JButton b=new JButton("click");//create button  
    b.setBounds(130,100,100, 40);  
     
    add(b);//adding button on frame  
    setSize(400,500);  
    setLayout(null);  
    setVisible(true);  
    }  
    public static void main(String[] args) {  
    new Simple2();  
    }

    }