There are 6 steps to write an RMI program,
- Create the remote interface
- Provide the implementation of the remote interface
- Compile the implementation class and create the stub and skeleton objects using the rmic tool
- Start the registry service by rmiregistry tool
- Create and start the remote application
- Create and start the client application
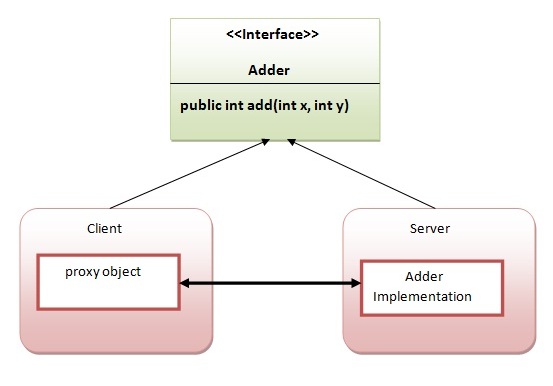
In this example, we have followed all the 6 steps to create and run the rmi application. The client application need only two files, remote interface and client application. In the rmi application, both client and server interacts with the remote interface. The client application invokes methods on the proxy object, RMI sends the request to the remote JVM. The return value is sent back to the proxy object and then to the client application.
1) create the remote interface
For creating the remote interface, extend the Remote interface and declare the RemoteException with all the methods of the remote interface. Here, we are creating a remote interface that extends the Remote interface. There is only one method named add() and it declares RemoteException.
2) Provide the implementation of the remote interface
Now provide the implementation of the remote interface. For providing the implementation of the Remote interface, we need to
- Either extend the UnicastRemoteObject class,
- or use the exportObject() method of the UnicastRemoteObject class
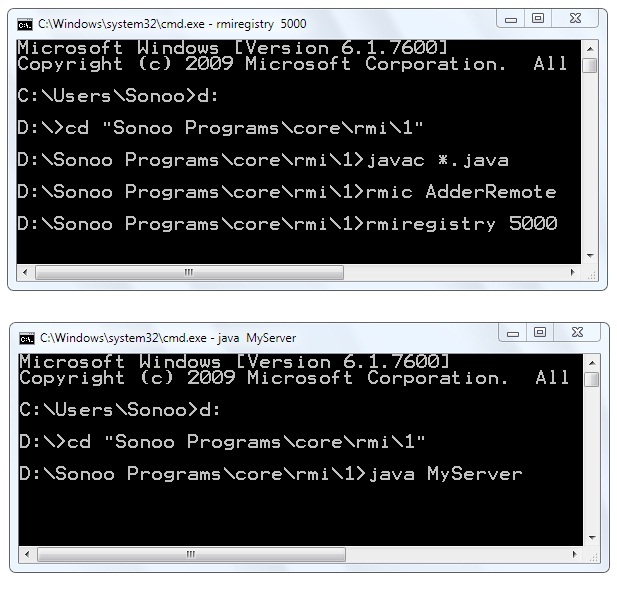
3) create the stub and skeleton objects using the rmic tool.
Next step is to create stub and skeleton objects using the rmi compiler. The rmic tool invokes the RMI compiler and creates stub and skeleton objects.
4) Start the registry service by the rmiregistry tool
Now start the registry service by using the rmiregistry tool. If you don't specify the port number, it uses a default port number. In this example, we are using the port number 5000.
5) Create and run the server application
Now rmi services need to be hosted in a server process. The Naming class provides methods to get and store the remote object. The Naming class provides 5 methods.
- public static java.rmi.Remote lookup(java.lang.String) throws java.rmi.NotBoundException, java.net.MalformedURLException, java.rmi.RemoteException; it returns the reference of the remote object.
- public static void bind(java.lang.String, java.rmi.Remote) throws java.rmi.AlreadyBoundException, java.net.MalformedURLException, java.rmi.RemoteException; it binds the remote object with the given name.
- public static void unbind(java.lang.String) throws java.rmi.RemoteException, java.rmi.NotBoundException, java.net.MalformedURLException; it destroys the remote object which is bound with the given name.
- public static void rebind(java.lang.String, java.rmi.Remote) throws java.rmi.RemoteException, java.net.MalformedURLException; it binds the remote object to the new name.
- public static java.lang.String[] list(java.lang.String) throws java.rmi.RemoteException, java.net.MalformedURLException; it returns an array of the names of the remote objects bound in the registry.
In this example, we are binding the remote object by the name sonoo.
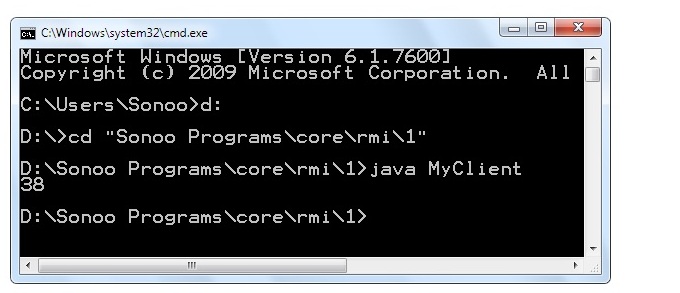
6) Create and run the client application
At the client we are getting the stub object by the lookup() method of the Naming class and invoking the method on this object. In this example, we are running the server and client applications, in the same machine so we are using localhost. If you want to access the remote object from another machine, change the localhost to the host name (or IP address) where the remote object is located.
Example source code,
import java.rmi.*;
public class MyClient{
public static void main(String args[]){
try{
Adder stub=(Adder)Naming.lookup("rmi://localhost:5000/sonoo");
System.out.println(stub.add(34,4));
}catch(Exception e){System.out.println(e);}
}
}
import java.rmi.*;
import java.rmi.server.*;
public class AdderRemote extends UnicastRemoteObject implements Adder{
AdderRemote()throws RemoteException{
super();
}
public int add(int x,int y){return x+y;}
}
import java.rmi.*;
public interface Adder extends Remote{
public int add(int x,int y)throws RemoteException;
}
import java.rmi.*;
import java.rmi.registry.*;
public class MyServer{
public static void main(String args[]){
try{
Adder stub=new AdderRemote();
Naming.rebind("rmi://localhost:5000/sonoo",stub);
}catch(Exception e){System.out.println(e);}
}
}
No comments:
Post a Comment